起動すると左下に通知があった。

ボードマネージャを見ると。

ライブラリマネージャを見ると。

フムフムー、便利。
起動すると左下に通知があった。
ボードマネージャを見ると。
ライブラリマネージャを見ると。
フムフムー、便利。
travis CIが走った!走ったぞ!!!(じょばー pic.twitter.com/QzvPtG2yeP
— Nao Tsukuba Tomori つくばの友利奈緒 (@takuzirra) July 18, 2018
参考:
参考通り進めて、git pushしようとしたら
[chino@kafu cpp-test-travis-ci]$git push -u origin master
git@github.com: Permission denied (publickey).
fatal: Could not read from remote repository.
Please make sure you have the correct access rights
and the repository exists.
permissionがおかしいとでるので、ssh keyを登録し直した。
参考:
それでsshの接続テストは成功したけど、あいかわらずgit pushが通らない。。。
[chino@kafu cpp-test-travis-ci]$ssh -i ~/.ssh/id_rsa_github git@github.com
Enter passphrase for key '/Users/chino/.ssh/id_rsa_github':
PTY allocation request failed on channel 0
Hi takurx! You've successfully authenticated, but GitHub does not provide shell access.
Connection to github.com closed.
[chino@kafu cpp-test-travis-ci]$git push -u origin master
git@github.com: Permission denied (publickey).
fatal: Could not read from remote repository.
Please make sure you have the correct access rights
and the repository exists.
は成功したけど、あいかわらずgit pushが通らない。。。
エラーでぐぐったら、ssh-addコマンドを使えば良いとのことでやったところできるようになった。
参考:
[chino@kafu cpp-test-travis-ci]$ssh-add /Users/chino/.ssh/id_rsa_github
Enter passphrase for /Users/chino/.ssh/id_rsa_github:
Identity added: /Users/chino/.ssh/id_rsa_github (/Users/chino/.ssh/id_rsa_github)
[chino@kafu cpp-test-travis-ci]$git push -u origin master
Counting objects: 8, done.
Delta compression using up to 4 threads.
Compressing objects: 100% (6/6), done.
Writing objects: 100% (8/8), 799 bytes | 399.00 KiB/s, done.
Total 8 (delta 0), reused 0 (delta 0)
To github.com:takurx/cpp-test-travis-ci.git
* [new branch] master -> master
Branch 'master' set up to track remote branch 'master' from 'origin'.
ssh key指定のsshも試したけど、これはだめだったわ。
github に SSH key を登録しても Permission denied (publickey) | Home Made Garbage
[chino@kafu cpp-test-travis-ci]$ssh -i ~/.ssh/id_rsa_github git@github.com
Enter passphrase for key '/Users/chino/.ssh/id_rsa_github':
PTY allocation request failed on channel 0
Hi takurx! You've successfully authenticated, but GitHub does not provide shell access.
Connection to github.com closed.
[chino@kafu cpp-test-travis-ci]$git push -u origin master
git@github.com: Permission denied (publickey).
fatal: Could not read from remote repository.
Please make sure you have the correct access rights
and the repository exists.
そして、Travis CIをwebから設定した。再度pushをかける。
Readme.mdを編集して、commitしてpushしたら、Travis CIが走った。
[chino@kafu cpp-test-travis-ci]$git commit -a
[master 1657762] trigger to push
1 file changed, 1 insertion(+)
[chino@kafu cpp-test-travis-ci]$git push origin master
Counting objects: 3, done.
Delta compression using up to 4 threads.
Compressing objects: 100% (2/2), done.
Writing objects: 100% (3/3), 330 bytes | 330.00 KiB/s, done.
Total 3 (delta 0), reused 0 (delta 0)
To github.com:takurx/cpp-test-travis-ci.git
82de7d1..1657762 master -> master
以下だとpushできなかった。なんでだろ。後で調べる。
コマンドラインのgitは覚えないと。コマンドラインからの方が楽ではあるので。
[chino@kafu cpp-test-travis-ci]$git commit -m "trigger to push"
On branch master
Your branch is up to date with 'origin/master'.
Changes not staged for commit:
modified: README.md
no changes added to commit
[chino@kafu cpp-test-travis-ci]$git push -u origin master
Branch 'master' set up to track remote branch 'master' from 'origin'.
Everything up-to-date
追記:バッチのリンク入れるのを忘れてた。
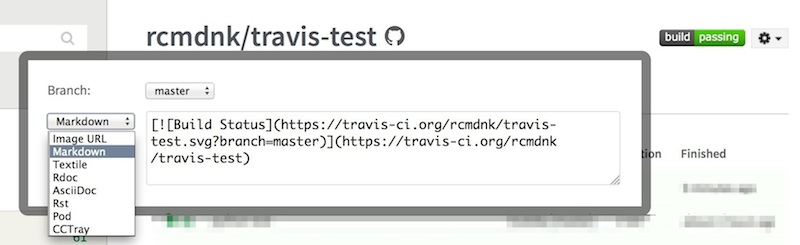
バッジを貼る
設定が出来てテストなどを行えたら結果の表示をしたいわけですが、 バッジはTravis CIにある各レポジトリの右上のバッジ部分をクリックすると バッジのURLなどが出てきます 9。
つけまーつけまー。付けました。 pic.twitter.com/bXHSsEmcw0
— Nao Tsukuba Tomori つくばの友利奈緒 (@takuzirra) July 19, 2018
はい。
http://www.tomorinao.space/cgi-bin/hello_clang.cgi
どちゃくそはまった。
手順は、
ubuntuのapacheでCGIの許可の設定をして、apache再起動。
指定の場所(今回は/cgi-bin以下)にcgiを配置する。
ラズベリーパイ CGI言語 | 言語・開発 | ラズベリーパイ勉強室 | 株式会社アイネックス|Webシステム構築 | データ復旧サービス |ホームページ作成 | AS400ソリューション
1.CGIのリンクを有効にする
sudo ln -s /etc/apache2/mods-available/cgi.load /etc/apache2/mods-enabled/cgi.load
2.CGI を利用するため設定ファイルの変更
/etc/apache2/mods-available/mime.conf 219行目のコメントアウトをはずす
219 # AddHandler cgi-script .cgi
/etc/apache2/sites-available/000-default.conf 28行目のコメントアウトをはずす
28 # Include conf-available/serve-cgi-bin.conf
書いてたら、これで良いのではという気がしてきた。
Ubuntu上のApacheでCGIを実行できるようにするメモ | 青竹雑記帖(新)
Ubuntu ServerでCGIプログラムを動作させる - サーバーでもUbuntuを使っています
より。
$ ls /etc/apache2/mods-available/
でload可能なモジュール一覧があって、
$ ls /etc/apache2/mods-enabled/
で、使用可能になっているモジュールが確認できる。
$ sudo vim conf-enabled/serve-cgi-bin.conf
CGI動作に必要そうな
$ sudo a2enmod cgi
$ sudo a2enmod cgid
(cgidだけで良いかも。
Apache 2.2 からは mod_cgi ではなく mod_cgid を使う)
をして、apache再起動。
$ sudo systemctl restart apache2
今回は/var/www/cgi-bin/を配置した。
ので、それの設定をしていく。
10 <IfDefine ENABLE_USR_LIB_CGI_BIN>
#CGIディレクトリ:/var/www/cgi-bin/をURL:http://example.com/cgi-bin/に割り当てる11 ScriptAlias /cgi-bin/ /var/www/cgi-bin/
12 #ScriptAlias /cgi-bin/ /usr/lib/cgi-bin/
#CGIディレクトリコンテナ13 <Directory "/var/www/cgi-bin">
14 #<Directory "/usr/lib/cgi-bin">
15 AllowOverride None
16 Options +ExecCGI -MultiViews +SymLinksIfOwnerMatch
17 Require all granted
18 Allow from all
# cgi-scriptが拡張子.cgiを処理するように設定
# (拡張子.cgiをCGIのファイルとする設定)
19 AddHandler cgi-script .cgi
20 </Directory>
21 </IfDefine>
219 AddHandler cgi-script .cgi
一応、/etc/apache2conf-available/serve-cgi-bin.confをincludeするようにしたけど、
上で/etc/apache2conf-enable/serve-cgi-bin.confを書き換えていて、同じ内容なので、これ必要ないですね。
UNIXユーザ奮戦記(ubuntu Apache2設定 CGI)の内容を、やっと理解した。
$ sudo vim /etc/apache2/sites-available/000-default.conf
28 Include conf-available/serve-cgi-bin.conf
いや違う?操作は再起動とa2ensite/a2sissiteコマンドで行って、
xxxx-available以下のファイルを書き換えた方が良さそうっぽい。
設定フォルダ 設定内容 /etc/apache2/site-available サイト設定を 000-default.confをもとに新規作成 /etc/apache2/conf-available 必要に応じてsecurity.confなどを修正 /etc/apache2/mods-available モジュール設定はここ /etc/apache2/site-enabled a2ensite/a2dissiteで設定が反映/削除 /etc/apache2/conf-enabled a2enconf/a2disconfで設定が反映/削除 /etc/apache2/mods-enabled a2enmod/a2dismodで設定が反映/削除 /etc/apache2/port.conf port変更の設定はここ? ``(Listen 8080など)
とりあえずはapacheの設定は完了。
そして、SFTPでCGIの実行ファイルを配置場所に送っているのに動かない。

サーバの設定を何回確認しても、あってそうだったので、
pythonで試したら動くああああああ。
http://www.tomorinao.space/cgi-bin/hello_python.cgi
ゆっくり考えてみたら、
Mac OS XからUbuntuにSFTPで実行ファイル送ってたので、
試しにソースを送って、Ubuntuサーバ上でコンパイルしたら動いた。
当たり前といえば当たり前。チャンチャン。
webフレームワーク流行らないわけだわーコンパイルめんどくさいわー
と思ってたら、C++ web Frameworkあるみたいで。
実行速度は速そうだし、Jenkinsとかでコンパイルを自動化したら使えるかなーという感じ。
参考:
ApacheのAddHandlerはセキュリティ上の懸念から使用すべきではない - Dマイナー志向
Ubuntu Linuxで、ApacheのモジュールとVirtualHostを追加する - CLOVER
Ubuntu版Apache2でmod_rewriteを有効にする
pythonの場合
文字列を表示する - Python CGIプログラミング入門
そーす。
まずはubuntu 16.04でAnacondaの環境構築。
【随時更新】pyenv + Anaconda (Ubuntu 16.04 LTS) で機械学習のPython開発環境をオールインワンで整える | ALGO GEEKS
上記の環境構築手順のコマンドをそのままコピペで。
Anacondaのバージョンの最新が5.2.0になっていたので、そこだけは変更した。
anaconda-navigatorの起動を確認した。
OCRについては下記を。
$ brew install tesseract
は、brewをインストールするのがめんどくて、
aptで入ることがわかったので、
$ sudo apt install teseract-ocr
で代替した。
あとは、参考よりそのままpythonコードをコピペして実行した。
import pytesseract
from PIL import Image

url_img = '20180524231805.png'
img = Image.open(url_img)
text = pytesseract.image_to_string(img, lang="eng")
print(text)
実行結果
(base) chino@kafu:~/デスクトップ$ python ocrtest.py
Abcdefg hijklmn
—

すごい簡単できてしまったなあ。環境構築、実行手順の参考リンクも詳しくて、ありがたいなあという感じです。現場からは以上です。
(コード書いてないw。あと日本語。)
それとこれ、なんだろう。
>distributed 1.21.8 requires msgpack, which is not installed.

にbitcoinボタンを追加した。
うpする前に、
で確認した。
スクリプトは下記を参考にした。
https://sourceforge.net/projects/bitcoin-button/
ボタンの画像は下記より。